A garage door opener repair is a technical process involving the diagnostic and restorative work required to maintain an automated entry system. This intervention focuses on correcting mechanical imbalances or electronic faults within the motor housing and the centralized circuit board. Without timely repair, minor friction in the drive belt can lead to catastrophic failure of the entire assembly. Professional calibration ensures that every component works in synchronization to provide secure and reliable access to your property.
A high-quality professional garage door service targets the root cause of malfunctions rather than just addressing surface-level symptoms. Modern systems rely on rolling code technology and complex safety sensors that require precise alignment to meet safety standards. When homeowners overlook these technical requirements, they drastically shorten the lifespan of the garage door openers and risk sudden operational failure. This guide serves as a technical roadmap for identifying when a system requires a strategic garage door opener replacement.
Understanding How Your Garage Door Opener Works
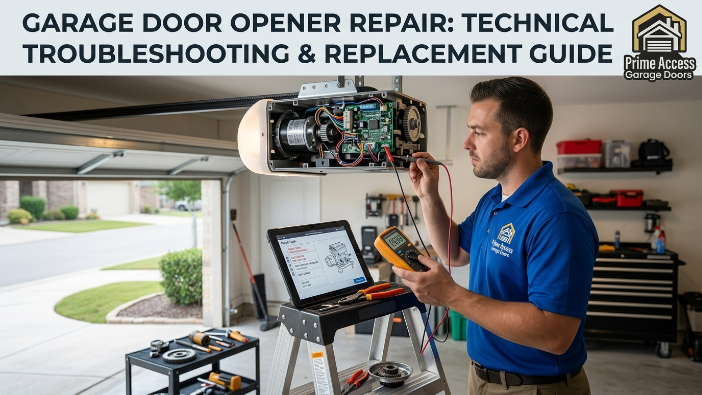
The modern opener serves as the electromechanical heart of your garage, converting electrical energy into the physical force needed to move the door. This system utilizes a motorized drive assembly to pull a carriage along a rail, which is counterbalanced by the tension springs. Logic is handled by an internal circuit board that processes signals from remotes and wall stations.
Safety is maintained through a constant loop between the auto-reverse mechanism and the infrared photo eyes. Every cycle puts measurable wear on these components, necessitating regular garage door opener maintenance.
Drive System Architecture
The drive system is typically configured as either a chain drive or a high-performance drive belt. Chain systems are valued for their raw strength and durability in heavy-duty applications. Belt systems utilize reinforced rubber to provide a silent, vibration-free operation for residential settings. Both designs require specific tensioning to prevent the motor from overworking during the lift cycle.
Electronic Safety Logic
Safety is enforced by a pair of safety sensors that project an invisible beam across the door’s path. If this beam is interrupted, the auto-reverse mechanism immediately halts and reverses the downward motion. This logic is a mandatory safety standard designed to prevent entrapment or property damage. Modern units also integrate smart garage opener technology for real-time monitoring via encrypted signals.
Why Garage Door Openers Fail
The primary drivers of failure are mechanical fatigue, environmental stressors, and the natural expiration of the garage door opener’s lifespan. Over time, the gears inside the motor housing can strip due to excessive friction or lack of lubrication. Electrical surges frequently compromise the circuit board, leading to unresponsive controls or erratic door behavior.
If the limit switch adjustment is incorrect, the motor may continue to run after the door is closed, causing internal damage. Furthermore, worn tension springs force the opener to lift more weight than it was engineered to handle, leading to motor burnout. Neglecting garage door opener troubleshooting at the first sign of noise usually results in a more expensive and complex repair.
6 Step Guide To Garage Door Opener Repair
A systematic approach to garage door opener troubleshooting is required to isolate mechanical issues from electronic sensor faults. You must first verify that the power supply is consistent and that the circuit board is receiving a clean signal from the transmitters. Checking the alignment of the photo eyes often resolves “no-close” issues without the need for tools or replacement parts.
If the motor is running but the chain drive is not moving, the issue is likely a stripped gear or a disconnected emergency release. Precise execution of these steps ensures the system is restored to its original manufacturer specifications and safety ratings.
Calibrating Limit Switches
Adjusting the travel limits ensures the door opens fully and closes with the correct amount of pressure against the floor. Use the adjustment screws on the side of the unit to define the exact start and stop points for the carriage.
Incorrect limits can trigger the auto-reverse mechanism falsely, causing the door to bounce back up repeatedly. Proper calibration prevents unnecessary strain on the drive assembly and ensures a tight weather seal.
Aligning Safety Sensors
The safety sensors must be perfectly leveled and pointed directly at each other to maintain a solid communication link. Look for the indicator lights on both the sender and receiver to confirm that the infrared path is unobstructed.
Even a slight tilt in the mounting bracket can cause the system to fail its safety checks. Clean the lenses with a soft cloth to remove dust that might be diffusing the sensor beam.
Drive Chain Tensioning
Maintaining the correct tension on a chain drive prevents the chain from skipping off the sprocket or sagging onto the rail. A sagging chain creates excessive noise and can lead to uneven wear on the motor’s drive gear.
Use the adjustment bolt on the trolley to tighten the chain until it sits slightly above the rail. Avoid over-tightening, as this creates high-frequency vibration that can loosen internal electronic connections.
Logic Board Diagnostic
If the opener acts erratically, you must inspect the circuit board for signs of overheating or blown capacitors. Check all wire terminals to ensure that the wall button and sensor wires are seated firmly in their ports.
Sometimes, a simple power cycle or a “learn” button reset can resolve software glitches in the rolling code technology. If physical damage is visible on the board, a direct component replacement is the only reliable fix.
Smart Module Integration
A smart garage opener requires a stable Wi-Fi connection and updated firmware to interact correctly with home automation hubs. If the app displays an “offline” status, check the signal strength at the motor housing location.
Technical conflicts between the smart module and the manual limit switches can sometimes cause positioning errors. Ensure the app is calibrated to match the physical open and close positions of the door.
Testing Safety Reversals
The final step in any repair is testing the auto-reverse mechanism using a physical obstruction like a block of wood. The door must reverse within two seconds of making contact with the object to pass safety protocols.
This test confirms that the force settings are adjusted correctly to protect people and vehicles. Regular testing of this feature is the most critical part of a comprehensive garage door opener maintenance plan.
When To Replace Your Garage Door Opener
Strategic garage door opener replacement becomes necessary when the cost of individual repairs approaches the price of a modern system. Units manufactured over 15 years ago lack the advanced security of current rolling code technology, leaving your home vulnerable. Persistent circuit board failure or a failing motor indicates that the unit has exceeded its reliable service life.
Newer models offer significantly better torque management and integrated smart garage opener features for superior control. Prioritizing a replacement over a failing repair ensures long-term safety and reduces the frequency of emergency service calls.
Analyzing Repair ROI
If you find yourself frequently performing limit switch adjustments or replacing gears, the mechanical integrity of the unit is likely compromised. Spending money on a 10-year-old motor is often a poor investment compared to the efficiency of a new DC-powered unit.
A new installation provides a fresh garage door opener lifespan and usually includes quieter drive technology. This proactive approach prevents the inconvenience of a total system lockout at an inopportune time.
Security and Safety Upgrades
Upgrading to a new unit is the only way to guarantee your system meets the latest UL 325 safety standards for residential openers. Older units without functional safety sensors or a reliable auto-reverse mechanism are a significant liability.
Modern replacements also feature battery backup systems that allow the door to operate during power outages. These technical improvements provide a level of security that older, repaired units simply cannot match.
Impact on Drive Components
A failing opener often puts undue stress on the tension springs and rollers, leading to secondary hardware failures. By installing a new unit with “soft start and stop” technology, you extend the life of the entire garage door system.
Modern motors are designed to monitor the force required for every cycle, adjusting output to compensate for minor hardware changes. This intelligence ensures that your professional garage door service needs are minimized over the coming decade.
Benefits of Professional Opener Service
Engaging in a professional garage door service ensures that your high-torque motor and electronic components are calibrated to exact manufacturer specifications. Certified technicians possess the specialized diagnostic tools required to identify microscopic fractures in the motor housing or trace intermittent circuit board failure.
Beyond mere aesthetics, professional oversight maintains the structural integrity of your tension springs by ensuring the motor doesn’t overcompensate for balance issues. A routine inspection can effectively double your garage door opener’s lifespan by mitigating the friction that leads to premature gear stripping.
Precision Safety Calibration
Technicians prioritize the calibration of the auto-reverse mechanism to ensure the system reacts instantly to any physical obstruction. This technical adjustment is critical for preventing liability and ensuring the system meets modern UL 325 safety standards.
Professionals also verify that the rolling code technology is properly synced to prevent unauthorized signal grabbing from external devices. Without this level of precision, your home’s primary entry point remains a significant security and safety vulnerability.
Electrical System Integrity
The internal logic of a smart garage opener requires a stable voltage and clean data paths to function without software glitches. A professional service includes a thorough inspection of the circuit board and wiring harnesses to prevent short circuits caused by vibration.
Technicians can update firmware and optimize Wi-Fi signal reception within the garage environment to ensure seamless app connectivity. This technical deep-dive prevents the “ghost openings” and unresponsive commands often found in neglected, older systems.
Mechanical Optimization
Whether your system utilizes a chain drive or a drive belt, the tension must be set within a very specific tolerance range. Professionals use force-gauge tools to ensure the drive assembly isn’t putting unnecessary lateral pressure on the motor shaft.
This optimization reduces operational noise and prevents the drive sprocket from wearing down prematurely due to misalignment. Maintaining this mechanical equilibrium is the only way to ensure the quiet, smooth operation of high-end belt-driven units.
Common Garage Door Opener Issues
Identifying common mechanical failures is the first step in determining if you require a simple repair or a full garage door opener replacement. Most homeowners encounter issues when the safety sensors become misaligned due to accidental contact or heavy vibration during the door’s cycle. A flickering light on the motor housing usually indicates a diagnostic code, often pointing toward a failed auto-reverse mechanism or a blocked infrared beam.
If the motor hums but the door fails to move, the internal nylon gears have likely stripped, requiring a teardown of the drive assembly. Environmental factors like extreme heat or humidity can also accelerate circuit board failure, leading to a complete loss of remote programming.
Safety Sensor Obstructions
The photo eyes must maintain a constant, uninterrupted infrared link to allow the door to close. Even minor dust buildup or a loose mounting bracket can break this connection and halt operation.
- Clean lenses with a microfiber cloth to ensure maximum signal strength.
- Verify that both LED indicators are solid and not flickering or dimming.
- Tighten the wing nuts on the mounting brackets to prevent vibration-induced shifts.
Drive Assembly Fatigue
Excessive noise or jerky movements usually signal that the chain drive or belt has stretched beyond its operational limits. This fatigue increases the load on the motor and can lead to a snapped drive line.
- Check for sagging in the chain or belt along the length of the rail.
- Apply a high-grade lithium lubricant to the sprocket and rail assembly.
- Inspect the belt for fraying or the chain for rusted links that impede movement.
Limit Switch Misalignment
When the door fails to seal against the floor or reverses immediately upon touching it, the limit switch adjustment is likely off. This causes the motor to “think” it hasn’t reached its destination, triggering a safety reversal.
- Locate the plastic adjustment screws on the side of the opener chassis.
- Turn the “down” limit screw in small increments to find the perfect seal.
- Test the travel after every adjustment to avoid crashing the door into the header.
Troubleshooting Your Garage Door Opener
Effective garage door opener troubleshooting requires a systematic elimination of variables, starting with the most basic power and signal checks. You should first verify that the safety sensors are glowing steadily, as a blocked beam is the most frequent cause of a door refusing to close. If the wall station works but the remotes do not, the issue is likely frequency interference or a failure in the rolling code technology synchronization.
Inspect the motor housing for any burnt smell or visible damage to the circuit board, which would necessitate a professional component replacement. It is also vital to disconnect the opener and manually test the door’s balance to ensure the tension springs aren’t the underlying cause of the motor’s struggle. A well-executed troubleshooting protocol can save hours of downtime and help you decide if a garage door opener maintenance session will suffice or if the unit is beyond its viable service life.
Garage Door Opener Repair Costs
Calculating the total investment for a garage door opener repair requires an analysis of both component costs and specialized labor rates. Most homeowners find that the complexity of the circuit board or the weight of the door dictates whether a simple fix is viable. If the motor housing has sustained internal damage, the repair costs can quickly approach the price of a total garage door opener replacement.
Professional diagnostic fees typically cover the calibration of the auto-reverse mechanism and a full safety system check. Understanding these price points allows for a data-driven decision on whether to extend the garage door opener’s lifespan or upgrade to modern technology.
| Repair Component | Average Part Cost | Labor Intensity | Primary Symptom |
| Circuit Board | $80 – $150 | Medium | Intermittent remote signal / No power |
| Safety Sensors | $40 – $90 | Low | Door won’t close / Lights flashing |
| Drive Belt / Chain | $50 – $120 | High | Grinding noise / Door not moving |
| Motor Assembly | $150 – $250 | Very High | Humming sound but no movement |
| Limit Switch | $20 – $50 | Medium | Door reverses or won’t seal |
| Tension Springs | $75 – $200 | High | Opener straining / Heavy door |
| Capacitor | $15 – $40 | Medium | Motor starts, then dies immediately |
| Remote/Keypad | $30 – $60 | Low | Rolling code technology desync |
DIY Garage Door Opener Repair Techniques
Executing a DIY repair on an automated system requires a strict adherence to safety protocols to avoid high-tension accidents or electrical shorts. You should start by isolating the power source before attempting any work on the motor housing or the internal wiring.
Most minor operational issues can be solved by performing a precise limit switch adjustment to correct the door’s travel path. Cleaning the photo eyes and checking for loose mounting brackets often restores functionality without the need for expensive tools.
Troubleshooting Electronic Logic
Basic electronic maintenance involves verifying the integrity of the circuit board and ensuring the antenna wire is unobstructed. If your remotes are unresponsive, try clearing the memory and re-syncing the rolling code technology to eliminate frequency interference.
You should also inspect the wall button wiring for staples that may have pierced the insulation, causing a short circuit. For those with a smart garage opener, a simple firmware update via the mobile app can often resolve connectivity glitches.
Mechanical Drive Maintenance
Maintaining the drive assembly involves inspecting the chain drive or belt for signs of excessive slack or material fraying. You can adjust the tension by tightening the nut on the trolley assembly until the drive line sits roughly half an inch above the rail.
Applying a specialized lithium grease to the rail and sprockets will reduce friction and prevent the motor from overheating during heavy use. Always confirm the auto-reverse mechanism is fully functional after making any mechanical adjustments to the drive system.
Conclusion
Investing in timely garage door opener repair is the most effective way to preserve the mechanical equilibrium and security of your home’s entry system. By addressing minor issues like limit switch adjustment or safety sensor misalignment, you prevent the cascading failures that lead to expensive motor housing damage. Maintaining this technical oversight ensures that every cycle remains smooth, quiet, and fully compliant with modern safety standards.
A strategic approach to garage door opener maintenance ultimately extends the garage door opener’s lifespan while providing peace of mind through enhanced reliability. Whether you choose to integrate a smart garage opener or opt for a full garage door opener replacement, prioritizing high-authority components like a reinforced drive belt is essential. Consistent professional evaluation remains the definitive roadmap for navigating complex repairs and ensuring your automated system operates at peak efficiency for years to come.
FAQS
What do garage door openers do?
A garage door opener acts as the motorized control hub that automates the opening and closing of the door by pulling a carriage along a rail. It coordinates with the tension springs to lift the weight while managing security through rolling code technology and safety via the auto-reverse mechanism.
How to repair a garage door opener?
Repairing an opener involves a systematic diagnosis of the circuit board, power supply, and the alignment of the infrared safety sensors. Technical fixes often range from a precise limit switch adjustment to restoring travel distance to replacing stripped nylon gears within the motor housing.
Which drive is best for a garage door opener?
The “best” drive depends on your priority; a drive belt is superior for attached garages due to its near-silent, vibration-free operation. However, a chain drive is the preferred choice for heavy, oversized doors or detached workshops where maximum durability and cost-efficiency are more critical than noise levels.
What would make a garage door opener stop working?
A total operational failure is typically caused by a blown capacitor on the circuit board or a blocked signal between the photo eyes. Mechanical issues, such as a snapped drive belt or broken tension springs, will also prevent the motor from successfully cycling the door despite hearing the motor run.
Is there a fuse in a garage door opener?
While most modern units use a transformative circuit board with built-in surge protection or a reset button, some older models contain an internal glass fuse to protect the motor from electrical overloads. If your unit is completely unresponsive after a power surge, you must inspect the logic board for a replaceable fuse or a tripped thermal protector inside the motor housing.
