Maintaining peak energy efficiency in your home starts with your garage, as unsealed gaps often disrupt your household’s climate settings. Garage door insulation is not merely a winter luxury; it is a fundamental requirement to establish a robust thermal barrier against external temperature swings. Without high-quality garage door seals, your space becomes vulnerable to dust infiltration and fails in critical moisture prevention, leading to potential structural damage. By prioritizing professional weatherproofing, you transform your garage into a protected, temperate environment that shields your entire property.
Persistent air leakage through worn seals is a primary driver of skyrocketing utility costs and indoor discomfort. Consistent home maintenance in this area ensures reliable draft protection, which is essential for stabilizing the attached garage temperature and reducing the workload on your HVAC system. Garage door weather stripping serves as the frontline defense, sealing the perimeter to block outdoor pollutants and humidity. Replacing these components promptly preserves your garage door hardware by preventing rust and ensuring the system operates without unnecessary friction or resistance.
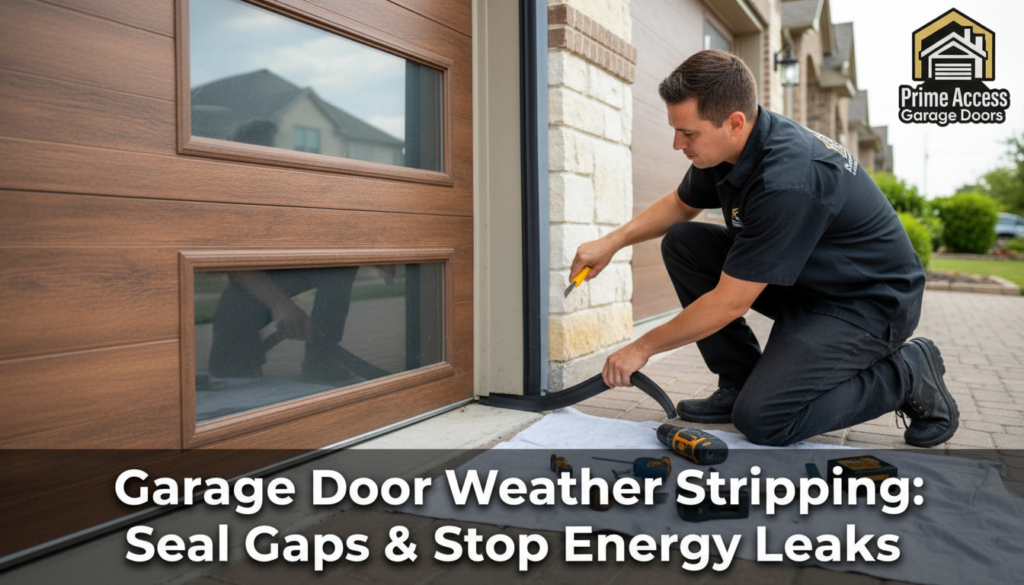
What is Garage Door Weather Stripping?
Garage door weather stripping refers to the specialized resilient materials installed along the top, sides, and bottom of a door to create an airtight seal. These components, typically manufactured from high-grade rubber or vinyl door seals, are designed to compress against the door frame to maintain strict climate control. A significant yet overlooked benefit is pest prevention, as these seals eliminate the tiny entry points that rodents and insects use to invade your home. Furthermore, if the garage floor threshold is not properly reinforced, heavy rainfall can lead to internal flooding and property damage. Investing in premium materials is the first step in a successful DIY garage repair that yields long-term dividends.
How to repair the garage door weather seal?
Repairing a garage door seal begins with a meticulous assessment to determine if the damage requires a minor fix or a full-scale replacement. Over time, a rubber bottom seal will lose its elasticity and crack, directly causing significant air leakage and compromising the door’s insulating properties. During the repair process, you must strip away the brittle remnants and sanitize the mounting surface to ensure the new material adheres or slides in perfectly. This restorative action immediately boosts the energy efficiency of the structure and significantly dampens external noise pollution. Utilizing a durable garage door stop molding during the repair ensures that side gaps are eliminated, providing a professional-grade finish to your maintenance efforts.
Inspecting for Physical Damage
Close the door completely during daylight hours to check for “light leaks,” which serve as an immediate indicator of seal failure. Identifying these specific gaps is the primary technical step in restoring comprehensive draft protection to the unit. If the existing material feels rigid or crumbles upon contact, it can no longer provide effective moisture prevention. Ensure you also check the garage door hardware for alignment issues that might be prematurely tearing the seal material.
Cleaning the Retainer Tracks
Before applying any repair materials, you must remove all accumulated debris, grease, and old adhesive from the tracks. A clean surface is mandatory for vinyl door seals to seat properly and create the necessary tension for a weather-tight fit. Use a mild degreaser and a stiff brush to ensure no residue remains that could interfere with the new seal’s performance. This foundational step is what separates a temporary fix from a permanent DIY garage repair success.
Applying Silicone Lubrication
Once the repair is finished, applying a silicone-based lubricant to the seals prevents them from sticking to the floor or cracking in extreme heat. Garage door insulation is only effective when the seals remain flexible enough to contour to the door’s movement every time it cycles. Proper lubrication minimizes friction against the frame, extending the lifespan of the garage door seals significantly. This simple maintenance habit is a cornerstone of long-term climate control and operational efficiency.
How to Install Garage Door Weather Stripping (Side and Top)
Installing side and top weather stripping is a high-impact DIY garage repair that fundamentally improves the door’s protective capabilities. When mounting side seals, ensure they are positioned close enough to create a seal without putting excessive strain on the motor or garage door hardware. It is critical to install the garage door stop molding while the door is in the closed position to achieve a perfect, gap-free alignment. Properly executed installation stabilizes the attached garage temperature, preventing the garage from becoming a “heat sink” during summer months. These perimeter seals not only enhance energy efficiency but also provide a cushioning effect that reduces door vibration and rattle.
Accurate Perimeter Measurements
Start by measuring the height of the side jambs and the width of the header to ensure you purchase sufficient material for the job. In the world of weatherproofing, improper sizing is the most common cause of persistent drafts and wasted material. Always allow for a one-inch overlap at the corners to ensure that the draft protection is continuous around the entire frame. Precise measurements are the only way to guarantee a professional result that looks integrated into the home’s architecture.
Cutting the Vinyl Seals
Utilizing a sharp utility knife or heavy-duty shears, cut your vinyl door seals at a 45-degree angle at the corners for a seamless mitered fit. Clean, precise cuts prevent the air leakage that typically occurs at the junction points of the top and side moldings. Ensuring the edges are smooth and straight also aids in moisture prevention by allowing water to shed away from the frame naturally. Taking your time with the cutting process prevents the need for messy caulking or unsightly gaps later on.
Fastening the Stripping Material
Secure the stripping to the door jambs using galvanized nails or screws, starting from the top and working your way down. Consistent spacing of fasteners is required to maintain a permanent thermal barrier and prevent the material from sagging over time. Once fastened, cycle the door several times to ensure the stripping doesn’t bind or interfere with the door’s travel. This final verification confirms that your home maintenance task has successfully bolstered the garage’s defense against the elements.
How to Replace Weather Stripping on Garage Door Bottom
Replacing the rubber bottom seal is a fundamental task for maintaining a climate-controlled environment and ensuring long-term moisture prevention. Over time, the constant friction against the driveway and exposure to UV rays causes the material to degrade, leading to significant air leakage. A successful DIY garage repair requires removing the old, brittle stripping and cleaning the retainer track to allow the new seal to slide in smoothly. Garage Door installing a fresh seal, you immediately restore the door’s thermal barrier, protecting your garage door hardware from rust caused by rain and snow. This simple upgrade is one of the most cost-effective ways to improve your home’s overall energy efficiency.
Removing the Damaged Seal
Start by opening the door to a comfortable working height and securing it with locking pliers to ensure safety. Slide the old rubber bottom seal out of the aluminum track, using a flat-head screwdriver to pry out any stuck or pinched sections. If the material is too brittle to slide, you may need to cut it into smaller sections for easier removal. Cleaning the track after removal is essential for ensuring the new weatherproofing material fits perfectly without binding.
Cleaning the Retainer Track
Once the old material is gone, use a stiff brush and soapy water to clear out dirt, webs, and debris from the metal grooves. A clean track is vital for pest prevention, as it ensures the new seal sits flush without leaving tiny gaps for insects. If the track is bent or crimped, use pliers to gently straighten the edges so the new vinyl door seals can glide through easily. Applying a light coat of silicone spray during this step will make the upcoming installation much faster.
Sliding in the New Seal
Fold the new seal into a “U” shape and feed it into the track, ideally with a partner pulling from the opposite end. Ensure the material remains centered and doesn’t stretch too thin, as this could compromise the draft protection at the corners. Trim any excess material, leaving about an inch on each side to tuck back into the track for a cleaner finish. This precise fit is what guarantees a high-performing thermal barrier for your garage interior.
How to Seal a Garage Door for Winter
Preparing for freezing temperatures requires a comprehensive look at your garage door insulation to prevent the space from becoming an ice box. Winter weatherproofing involves more than just the bottom seal; you must also inspect the perimeter for any signs of air leakage. Cold air entering an attached garage temperature zone can pull heat directly from your living quarters, forcing your furnace to work overtime. Adding a garage floor threshold can provide an extra layer of defense against drifting snow and freezing slush. Taking these steps before the first frost ensures your home maintenance is proactive rather than reactive during a storm.
Garage Door Weather Seal Models and Compatibility
Selecting the right garage door seals requires understanding the specific model of your door and the type of retainer track installed. Not all vinyl door seals are universal; some brands like Wayne Dalton or Amarr use proprietary designs that won’t fit a standard T-style track. Checking the compatibility of your garage door hardware ensures that the seal stays in place during high winds and heavy usage. If you choose an incompatible model, you risk leaving gaps that allow for moisture and pest prevention failure. Always measure the width of your track and the thickness of your door before purchasing replacement materials.
T-Style and Bead Seals
The T-style seal is the most common model, featuring two “T” shaped edges that slide into a double-channel aluminum retainer. Bead seals, on the other hand, use a circular “bead” that slides into a single-channel track often found on specific older door models. Ensuring the correct model is used is critical for maintaining a consistent thermal barrier across the entire width of the floor. Using the wrong style will lead to sagging and immediate air leakage.
P-Bulb and O-Ring Designs
P-bulb seals are named for their “P” shape and are frequently used on Finpoint or Overhead Door models to create a tight circular compression. O-ring seals provide a heavy-duty rubber bottom seal option that is excellent for uneven garage floors where a standard U-shape might fail. These specialized designs are vital for moisture prevention in regions that experience heavy seasonal rainfall. Matching the seal shape to your specific door brand is the hallmark of a professional DIY garage repair.
Types of Garage Door Bottom Seals
There are several varieties of bottom seals designed to tackle different environmental challenges and floor conditions. Standard rubber bottom seal options offer great flexibility in cold weather, while vinyl door seals are often more resistant to oil and chemical spills. For those living in areas with extreme temperature swings, a heavy-duty EPDM rubber is the best choice for a lasting thermal barrier. If your garage floor is cracked or unlevel, a thicker bulb-style seal can fill the voids more effectively than a thin strip. Understanding these types allows you to customize your weatherproofing for maximum durability and performance.
Standard U-Shape Seals
The U-shape is the industry standard for most residential doors, offering a flexible pocket of air that acts as a thermal barrier. It is easy to install and provides reliable draft protection against most flat driveway surfaces. When compressed, the “U” flattens out to cover a wide surface area, blocking out dust and debris effectively. This is the most common choice for general home maintenance due to its versatility.
Weighted or Foam-Filled Seals
Some high-end garage door insulation kits include seals filled with foam to prevent the material from collapsing over time. These are particularly useful for energy efficiency as they maintain their shape even after thousands of door cycles. The added density helps in pest prevention by making it harder for rodents to gnaw through the bottom of the door. They are the premium choice for homeowners who prioritize long-term climate control.
Brush Seals for Rolling Doors
Brush seals consist of thousands of stiff nylon filaments that are excellent at blocking out dust while allowing for door movement. While they aren’t the best for moisture prevention, they are superior for stopping airflow on commercial or rolling steel doors. Many people use them in conjunction with a garage floor threshold to get the best of both worlds. They are highly durable and rarely crack or become brittle like standard rubber options.
Garage Door Bottom Seal Replacement Instructions
To finish your replacement, lower the door slowly to ensure the new seal compresses evenly against the garage floor threshold. You should see the seal “mushroom” out slightly, which indicates it is filling the gap and providing total draft protection. If there are still visible gaps, you may need to adjust the limit switches on your garage door hardware to allow the door to close further. A properly installed seal will not only stop air leakage but also quiet the operation of the door by reducing vibration. Finalize the job by applying a silicone protectant to the new material to keep it soft and resilient for years to come. Professional-grade home maintenance like this ensures your garage remains a functional, energy-efficient part of your household.
Conclusion
Investing in high-quality weatherproofing is more than a simple cosmetic fix; it is a critical strategy for long-term home maintenance and structural protection. By effectively installing professional-grade garage door seals, you establish a permanent thermal barrier that significantly enhances your property’s energy efficiency. This proactive approach ensures that your attached garage temperature remains stable, shielding your home from the financial strain of air leakage and fluctuating utility costs.
Beyond temperature control, a comprehensive seal serves as a vital defense against external threats like flooding and infestations. Ensuring that your garage floor threshold and rubber bottom seal are in peak condition provides unparalleled moisture prevention and reliable pest prevention year-round. Ultimately, a well-maintained weather stripping system preserves your garage door hardware and ensures that your DIY garage repair efforts result in a quieter, safer, and more durable home environment.
FAQS
How to repair garage door weather seal?
To repair a garage door seal, you must first remove the brittle or damaged sections of the rubber bottom seal by sliding them out of the aluminum retainer track. Once the track is clear and sanitized, slide in a new, high-quality vinyl door seal to restore the door’s thermal barrier and eliminate air leakage.
Do you need silicone spray for weather stripping on garage door?
Yes, applying a silicone-based lubricant is essential because it keeps the garage door seals flexible and prevents them from cracking due to extreme temperature swings. This simple maintenance step reduces friction against the garage door hardware, ensuring a tighter seal and extending the lifespan of your weatherproofing materials.
How to install side and top weather stripping on a garage door?
Install the garage door stop molding by positioning it against the door jambs while the door is closed to ensure a gap-free alignment for draft protection. Secure the strips with galvanized fasteners every few inches to maintain a permanent seal that stabilizes the attached garage temperature and boosts energy efficiency.
What is the best weather stripping for garage doors?
The best option is typically a heavy-duty EPDM rubber bottom seal paired with a reinforced garage floor threshold for maximum moisture prevention. For the sides and top, high-grade vinyl door seals with built-in UV inhibitors offer the most durable solution for long-term climate control and pest prevention.
What are common problems with door sealing strips?
Common issues include material degradation, where the seal becomes brittle, leading to significant air leakage and increased energy costs. Additionally, improper installation often results in gaps at the corners, which compromise draft protection and allow moisture to bypass the thermal barrier, potentially damaging the garage door hardware.
