A malfunctioning garage door is more than an inconvenience; it is a significant security risk and a potential safety hazard for your household. A professional garage door opener repair involves a systematic teardown of the motorized unit to identify mechanical fatigue or electronic board failure. Instead of guessing at the problem, a garage door technician uses specialized tools to measure voltage and mechanical resistance. This comprehensive approach ensures that the underlying cause of the malfunction is eliminated, preventing repetitive service calls and extending the lifespan of your entire system.
The repair process is designed to restore the safety reverse function and ensure the opener motor operates without excessive strain. During a standard annual garage door service, technicians focus on the synchronization between the drive mechanism and the door’s physical weight. If the spring tension is incorrect, the opener will suffer premature wear, leading to a total system breakdown. By investing in a professional garage door inspection, you transition from reactive repairs to proactive garage door maintenance, ensuring every component, from the lifting cables to the safety sensors, is calibrated for peak performance.
Initial Inspection and Diagnostic Process
The diagnostic phase is the most critical stage of any garage door service, as it determines whether the issue is isolated to the motor or stems from the door’s hardware. A technician begins with a visual inspection of garage door panels and tracks to ensure no physical obstructions are forcing the motor to overwork. They will then perform a garage door balance test by disconnecting the opener and manually lifting the door to check for smooth movement.
If the door does not stay in place, the spring tension must be adjusted before any motor repairs can proceed. Following this, the rollers and tracks are examined for debris or flat spots that could cause the “stuttering” effect often mistaken for motor failure. Finally, the technician verifies the alignment of the safety sensors to ensure the infrared beam is unobstructed and communicating correctly with the logic board.
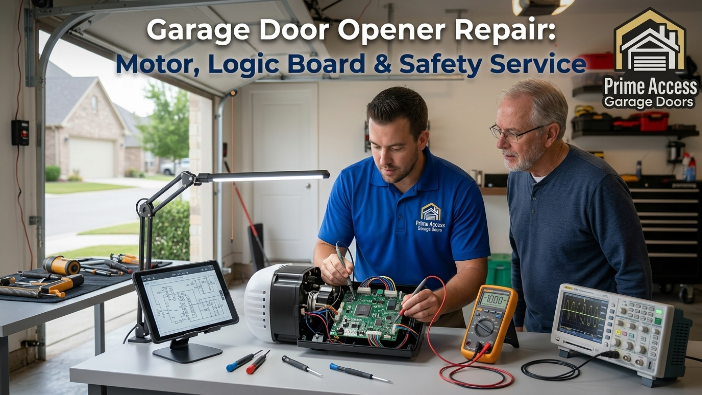
Electrical System Repair and Troubleshooting
Electrical troubleshooting targets the “brain” of the system, focusing on the logic board, wiring, and remote signal reception. Technicians use multimeters to check for consistent power flow and identify any shorts in the wall button wiring or the sensor leads. Often, a “dead” opener is simply the result of a blown capacitor or a logic board damaged by a power surge.
If the system is unresponsive, garage door opener reprogramming is performed to resync the handheld remotes and the keypad. This stage also includes checking the antenna wire for optimal range and ensuring the backup battery is holding a sufficient charge.
Logic Board Diagnostic and Replacement
The logic board manages every command, from the safety reverse function to the travel limits of the door. When this board fails, the opener may behave erratically, such as opening on its own or failing to respond to programmed remotes.
Technicians look for burn marks or swollen capacitors on the board and replace the unit if the circuitry is compromised. This precise electrical work is a core part of a professional garage door inspection to ensure long-term reliability.
Wiring Integrity and Connection Checks
Vibrations from the opener motor can loosen wire nuts or cause internal connections to vibrate out of their terminals over time. A repair specialist will trace the wiring from the motor head to the safety sensors and wall station to ensure no wires are pinched or frayed.
Proper wire management prevents intermittent failures that are difficult for homeowners to diagnose on their own. This technical step is essential for maintaining a consistent and safe garage door service frequency.
Remote and Keypad Synchronization
After electrical components are replaced, a full garage door opener reprogramming is necessary to set the open and close limits. This ensures the door creates a tight seal against the floor without putting unnecessary pressure on the garage door hinges.
Without professional limit-setting, the motor may continue to pull even after the door is fully open, leading to gear damage. Ensuring the signal is secure prevents unauthorized access and completes the technical repair of the electrical system.
Garage Door Opener Motor Repair or Replacement
The motor is the heart of the unit, and its repair often involves replacing the internal gear and sprocket assembly. Over time, the plastic gears inside the motor housing can strip, especially if the door is unbalanced or the garage door service frequency has been ignored. If the motor hums but the chain or belt doesn’t move, the technician will likely need to rebuild the drive assembly.
In cases where the motor windings are burnt out, a full replacement of the motor head may be the most cost-effective solution. To finish the repair, the technician applies a silicone-based lubricant to the drive rail to ensure quiet and smooth operation for the coming year.
Internal Gear and Sprocket Overhaul
The internal gears act as the sacrificial lamb of the system, designed to strip before the motor itself burns out. Replacing these gears involves opening the motor casing, removing the old grease, and installing a high-strength nylon gear kit.
This is a common repair that can add years of life to an older unit without the cost of a full replacement. It is a cost-effective alternative frequently suggested during professional garage door inspection visits.
Drive Chain or Belt Tensioning
Whether your system uses a chain or a reinforced belt, proper tension is vital for a quiet and reliable garage door service. A loose chain will slap against the rail, causing noise and vibration, while an over-tightened belt can snap or put excessive load on the motor shaft.
Technicians adjust the tensioning bolt to the manufacturer’s exact specifications to ensure silent, vibration-free movement. Correct tensioning reduces the physical stress on the opener motor and prevents future mechanical failures.
Applying Silicone-Based Lubricant
The final touch of a professional repair is the application of a high-grade silicone-based lubricant to all moving metal-on-metal parts. Unlike WD-40, which is a degreaser, a silicone spray provides a lasting protective layer that does not attract dust or grime.
This reduces the workload on the motor and prevents the grinding sounds that typically lead to homeowner complaints. Proper lubrication is a hallmark of high-quality garage door maintenance that protects your investment.
Sensor Alignment and Safety System Fixes
The safety sensors are the most sensitive electronic components of your entire garage assembly, requiring microscopic alignment to function correctly. If these infrared “eyes” are bumped by just a few millimeters, the opener motor will refuse to close the door as a fail-safe measure. A technician must verify that the brackets are rigid and that the lenses are free of any debris or spider webs that disrupt the beam.
Beyond simple cleaning, the wires connecting these sensors to the motor head must be checked for continuity and corrosion. Ensuring this system is operational is the most critical part of a professional garage door inspection to prevent injury or property damage.
- Infrared Beam Calibration: Technicians use laser leveling tools to ensure the sending and receiving units are perfectly centered. This prevents the door from reversing intermittently due to vibration during the closing cycle.
- Safety Reverse Function Test: A physical obstruction is placed in the door’s path to confirm the system detects resistance and retracts immediately. This test is mandatory during any annual garage door service to meet UL325 safety standards.
- Wiring Continuity Check: Small-gauge sensor wires are prone to being chewed by pests or pinched by moving lifting cables. Repairing these connections ensures the logic board receives a steady “all-clear” signal from the sensors.
- Lens Integrity Inspection: Scratched or clouded lenses can scatter the infrared light, leading to false obstruction signals. Replacing the sensor housings is often necessary if the plastic has degraded due to sun exposure.
- Mounting Bracket Stabilization: Sensors mounted to the track are susceptible to movement every time the door operates. Tightening these mounts ensures the garage door maintenance lasts until the next scheduled service visit.
Remote Control and Wall Switch Repairs
When the door fails to respond to commands, the issue usually lies in the signal path between the transmitter and the logic board. A technician begins by testing the wall-mounted station to determine if the fault is in the hardwiring or the wireless receiver. If the wall switch works but the remotes do not, the focus shifts to garage door opener reprogramming to clear outdated frequency codes.
Interference from LED bulbs or nearby electronic devices can often “blind” the receiver, requiring a technical workaround or a frequency filter. Furthermore, the internal antenna on the motor head must be inspected for damage that could limit its effective range. This meticulous troubleshooting ensures that your garage door technician restores convenient access without requiring a full motor replacement.
Gear and Sprocket Replacement Services
The gear and sprocket assembly is the mechanical bridge between the opener motor and the drive chain. Because these gears are typically made of high-density plastic to ensure quiet operation, they are the first parts to strip when the door is unbalanced. A technician must disassemble the motor chassis, remove the metal shavings, and install a reinforced gear kit to restore functionality.
Simply replacing the gear is a temporary fix; the technician must also identify why the gear failed, which usually points back to poor spring tension. Applying a high-grade silicone-based lubricant after the install ensures the new components don’t succumb to friction-related heat.
Rebuilding the Internal Drive Assembly
Replacing the gear and sprocket involves a complete teardown of the internal drive shaft and limit switches. The technician must carefully remove the old, contaminated grease and inspect the bushings for signs of excessive heat or wear.
Once the new gear is seated, a specialized silicone-based lubricant is applied to ensure the teeth mesh without grinding. This rebuild process is a cost-effective way to avoid the high expense of a brand-new opener.
Chain and Belt Tension Calibration
Once the new gears are installed, the drive chain or belt must be tensioned to the manufacturer’s exact specifications. If the tension is too high, the new gears will strip within months; if too loose, the chain will skip off the sprocket.
The garage door technician adjusts the tensioning bolt while observing the door’s travel to find the “sweet spot” of operation. Proper calibration is essential to keep the opener motor running efficiently and quietly over time.
Final Travel Limit Programming
The last step of a gear replacement is garage door opener reprogramming to redefine where the door starts and stops. This prevents the motor from forcing the door into the header or slamming it into the concrete floor, which would stress the new parts.
Technicians use the logic board’s “learn” mode to fine-tune these limits until the door seals perfectly against the weatherstripping. This final adjustment ensures the safety reverse function remains sensitive enough to detect real obstructions.
Lubrication and Mechanical Adjustments
Mechanical friction is the primary enemy of a high-functioning garage door system and the leading cause of premature motor failure. During this phase of the repair, a garage door technician applies a high-grade silicone-based lubricant to the rollers and tracks to ensure silent and fluid movement. Unlike generic oils, silicone does not attract dust or grime, which prevents the buildup of abrasive sludge inside the garage door hinges.
The technician also inspects the lifting cables for signs of fraying and ensures they are seated correctly within the drum grooves. If the door is noisy or “jerky,” it usually indicates that the garage door balance test has failed, requiring an adjustment of the spring tension. Finally, all mounting bolts on the opener motor chassis are tightened to eliminate vibrations that could loosen internal electrical connections over time.
Software Reset and Opener Reprogramming
Modern openers rely on complex logic boards that occasionally require a full system reset to clear ghost codes or travel errors. When the door refuses to close or stops halfway, garage door opener reprogramming is often the only way to recalibrate the electronic limits. A technician will wipe the existing memory to resolve signal interference issues and then resync all handheld remotes and wireless keypads.
This process ensures the motor knows exactly how much force to apply during the opening and closing cycles. Without these precise digital boundaries, the physical hardware is subjected to unnecessary torque and mechanical stress.
Calibrating Travel Limit Settings
The travel limits determine exactly where the door stops in relation to the floor and the header. If the down-limit is set too far, the opener motor will continue to push against the concrete, eventually stripping the internal gears.
A technician fine-tunes these settings to ensure a weather-tight seal without putting strain on the garage door hinges. This calibration is a vital step in any professional garage door inspection to ensure long-term mechanical integrity.
Force Sensitivity Adjustment
Force settings act as a digital watchdog, stopping the motor if it encounters more resistance than a standard door cycle requires. If the force is too high, the safety reverse function may fail to engage when an object is in the path.
Technicians adjust these settings incrementally, testing the door’s response to ensure it is both reliable and safe. This adjustment is particularly important during seasonal temperature shifts when the door’s weight can fluctuate slightly.
Remote and Keypad Frequency Resync
Signal interference from household electronics can often desynchronize remotes, making the door seem unresponsive. By performing a full garage door opener reprogramming, the technician ensures the receiver is locked onto a clean, secure frequency.
This step also involves updating the firmware on newer “smart” openers to patch any known security vulnerabilities. Final testing confirms that the wall station and all wireless transmitters are communicating perfectly with the logic board.
Safety Testing and Final Performance Check
The technical validation of safety mechanisms is the most critical phase of any garage door service, as it transitions the unit from “functional” to “safe.” A technician’s primary objective during this stage is to verify the UL 325 safety standards, which dictate that a door must reverse within two seconds of detecting an obstruction. This process involves a series of diagnostic tests that challenge the logic board’s response time and the physical integrity of the hardware.
Beyond the electronics, the mechanical balance is scrutinized; a door that is even slightly “heavy” or “hot” can cause premature motor burnout and erratic safety reversals. Ultimately, this final performance check serves as the professional seal of approval, ensuring the door operates with the precise fluidity and noise suppression required for long-term reliability.
The following table outlines the specific testing procedures, the technical benchmarks required for a “Pass” rating, and the risks associated with failure.
| Safety/Performance Test | Testing Methodology | Technical Benchmark (Pass) | Primary Component Tested | Risk of Failure |
| Photo-Eye Reversal | Interruption of infrared beam during the closing cycle. | Immediate reversal to full open position. | Infrared Safety Sensors | Potential for crush injuries or property damage. |
| Mechanical Force Test | Placing a 1.5-inch object (2×4 board) flat on the ground. | Door reverses upon contact with the object. | Opener Logic Board / Force Settings | Motor strain or frame damage upon hitting obstacles. |
| Manual Balance Test | Disconnecting the opener and lifting the door halfway. | Door stays in place or moves very slowly. | Torsion or Extension Springs | Excessive wear on opener gears and motor. |
| Manual Release Check | Pulling the emergency release cord in the closed position. | Trolley disconnects easily from the rail. | Emergency Release Carriage | Entrapment risk during power outages or fires. |
| Structural Integrity | Visual inspection of hinges, rollers, and track bolts. | Zero “play” or rattling during movement. | Mounting Hardware & Track | Catastrophic door derailment or falling. |
| Travel Limit Accuracy | Monitoring the door at the fully open and closed points. | Door seals tightly to the floor without “rebounding.” | Limit Switches / Hall Effect Sensor | Damage to the bottom seal or opener rail tension. |
| Noise Level Audit | Decibel monitoring during a full cycle. | Smooth, consistent sound without grinding. | Bearings, Rollers, and Motors | Indication of friction-based component failure. |
| Weather Seal Check | Inspection of perimeter and bottom astronomical seals. | Zero light visible from inside when closed. | Bottom Rubber & Vinyl Stops |
Conclusion
Investing in professional garage door opener repair is essential for maintaining the long-term structural integrity and safety of your home’s entry system. By addressing minor mechanical issues like spring tension and sensor alignment early, you effectively prevent catastrophic motor failure and costly full-system replacements. A qualified garage door technician ensures that every adjustment—from the lifting cables to the opener motor—is executed with mathematical precision. Ultimately, prioritizing high-quality garage door maintenance provides you with peace of mind and a reliable, high-performing door for years to come.
To maximize the lifespan of your hardware, you should adhere to a consistent garage door service frequency that includes both visual checks and technical diagnostics. While basic cleaning is a task for the homeowner, complex tasks like garage door opener reprogramming and gear overhauls require specialized tools and industry expertise. Proper application of a silicone-based lubricant combined with a rigorous garage door balance test will keep your system running silently and efficiently. Do not wait for a total breakdown to seek a professional garage door inspection, as proactive care is the most cost-effective strategy for any modern homeowner.
FAQS
How long does a garage door service take?
A standard professional garage door service typically takes between 45 to 90 minutes, depending on the condition of the hardware. This timeframe allows a garage door technician enough time to perform a full diagnostic, adjust spring tension, and apply silicone-based lubricant to all moving parts.
How often should a garage door be serviced?
You should schedule a professional garage door inspection at least once a year to ensure all safety systems are functioning correctly. Frequent users or those in harsh climates may require an annual garage door service every six months to prevent the lifting cables from fraying or snapping.
Can I lubricate the door myself?
Homeowners can certainly apply a silicone-based lubricant to the rollers, tracks, and hinges to reduce operational noise between professional visits. However, you must avoid using WD-40 or heavy grease, as these substances attract grit that can eventually destroy the bearings in your garage door hinges.
What if my garage door is noisy after a service?
If a door remains noisy after garage door maintenance, it often indicates an underlying mechanical issue like worn-out bearings or an unbalanced opener motor. You should call your technician back to perform a garage door balance test, as persistent noise is a primary indicator of excessive friction.
Do automatic garage doors need more maintenance?
Automatic systems require more frequent oversight because the opener motor and electronic safety sensors add layers of complexity to the mechanical hardware. Regular garage door opener reprogramming and safety tests are necessary to ensure the safety reverse function remains responsive to obstructions.
