A dented garage door is a mechanical liability disguised as a visual nuisance. Beyond sabotaging home curb appeal restoration, structural compromises from hailstorms or projectiles shift the panel’s center of gravity, placing uneven torque on torsion springs and cables. Ignoring these cosmetic dings is a tactical error; a slight misalignment today inevitably evolves into a total mechanical failure of the opener motor tomorrow.
Precision is the only defense against the long-term operational degradation of your system. Surface-level rust or corrosion on garage door panels isn’t just an eyesore—it’s a precursor to warping and creases that will eventually derail the rollers from their tracks. This professional assessment strips away the fluff of amateur maintenance, forcing you to confront the DIY limits of auto body filler for garage doors before you compromise the structural integrity of your home’s largest moving object.
Can you repair dented garage door panels?
The feasibility of a repair depends entirely on the severity of the structural integrity compromise and the location of the damage. While cosmetic dings and shallow dents are easily managed with suction or thermal expansion and contraction methods, deep creases often signal permanent metal fatigue. If the dent sits near cross beams or involves punctures and cracks, the panel may no longer provide the necessary rigidity for safe operation. You must also evaluate the door balance, as excessive weight from heavy patching compound can strain the opener motor. Ultimately, a professional assessment is required if the damage affects the alignment or the movement of cables and torsion springs.
Tools and Materials for Garage Door Panel Repair
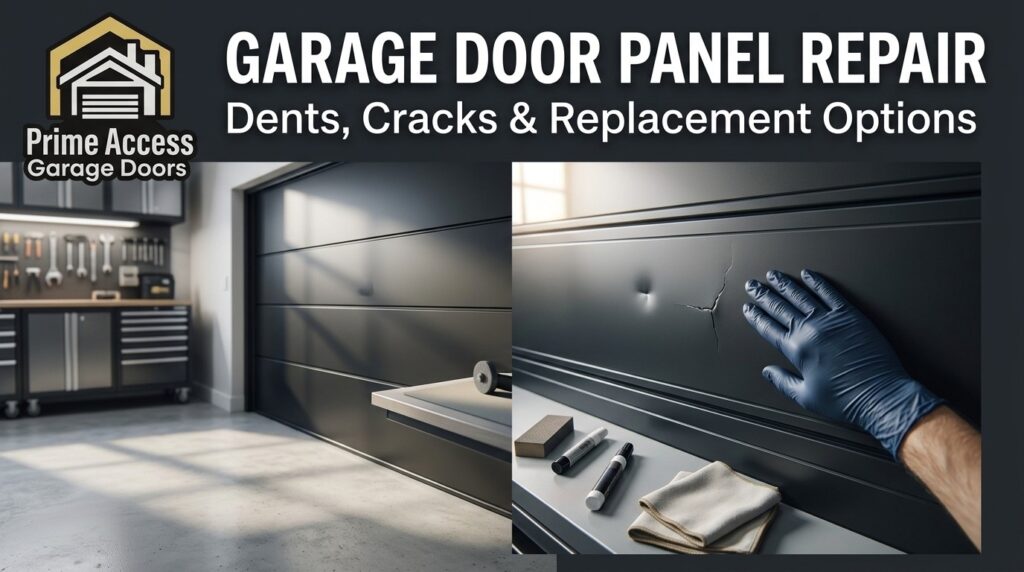
Successful restoration requires a specialized arsenal designed to manipulate high-gauge metal without triggering a catastrophic mechanical failure. You must utilize a plunger or industrial suction cups for primary tension release, while a rubber mallet paired with a wood block (2×4) allows for controlled force against dimpled texture without scarring the finish. Chemical stabilization is achieved through auto body filler (patching compound) and hardener, applied precisely with a putty knife to fill cracks or punctures.
To ensure the repair is sanding flush, you must progress through various grades of fine-grit sandpaper before sealing the site with metal primer. Ultimately, having compressed air and dry ice on hand provides the thermal leverage necessary to manage shallow dents that manual tools cannot reach.
Manual Reshaping and Suction Tools
The primary objective is to reverse the metal’s memory using a heavy-duty plunger to create the necessary suction for an initial pop. For stubborn creases, placing a wood block (2×4) against the interior and striking it with a rubber mallet ensures the force is distributed evenly across the garage door panels. This method prevents localized thinning of the metal, which would otherwise compromise the structural integrity of the section.
Thermal Expansion and Contraction Kit
To address cosmetic dings without invasive hammering, you must master the physics of temperature-induced movement. Using a lighter or heat gun followed immediately by a blast of compressed air or an application of dry ice forces rapid expansion and contraction. This sudden molecular shift often “pops” the dent back to its original plane, significantly reducing the amount of patching compound required later.
Surface Filling and Bonding Agents
When the metal is torn or exhibits punctures, you must utilize high-grade auto body filler for garage doors mixed with a specific ratio of hardener. This compound must be applied swiftly with a putty knife to avoid premature curing before the surface is leveled. Once hardened, this material provides the rigid backing necessary to maintain door balance and prevent moisture from fostering rust or corrosion within the core.
Finishing and Protective Materials
The final stage of a DIY garage door repair demands a smooth transition between the repair site and the original panel texture. Use fine-grit sandpaper to ensure the filler is sanded flush, followed by a thorough cleaning with dish soap to remove all particulates. Applying a professional-grade metal primer—while masking off the tracks and rollers with aluminum foil—is the only way to guarantee a long-lasting home curb appeal restoration.
Dealing with Major Damage: When to Replace Garage Door Panels
- Irreparable Structural Warping When high winds or heavy impacts cause significant warping of the cross beams, the panel’s geometry is permanently destroyed. These deep creases prevent the door from sitting flush in the tracks, leading to a complete mechanical failure. In these instances, a full panel replacement is the only way to restore the safety and functionality of the unit.
- Excessive Rust and Corrosion If rust has progressed into punctures or widespread cracks, the metal’s core strength has been completely compromised. Surface-level auto body filler for garage doors will not fix oxidized metal that is flaking away from the interior. Replacing the damaged section is the only way to maintain the structural integrity of the entire assembly.
- Compromised Mechanical Components Damage that extends to the torsion springs, cables, or rollers indicates a high-energy impact that simple DIY fixes cannot resolve. Because these parts are under high tension, attempting a cosmetic fix while the hardware is failing is a major safety risk. You must seek an expert opinion to determine if the panel can be saved or if the system is unsafe.
- Cost-Benefit Analysis If multiple garage door panels exhibit dimpled texture from severe hailstorms, the labor and material costs for repair may exceed replacement. Total replacement often provides a better return on home curb appeal restoration than a door covered in visible patches. Always weigh the curing time and effort against the long-term reliability of a factory-fresh panel.
Step-by-Step Guide to Fixing Garage Door Panel Dents
To execute a dented garage door panel fix that actually lasts, you must transition from a homeowner to a technician, prioritizing mechanical precision over quick aesthetics. The process begins by neutralizing the door’s weight—disconnecting opener systems and ensuring the door is manually locked in place to prevent sudden movement during the repair.
You are not just hiding a blemish; you are restoring the structural integrity of a heavy-moving assembly where every gram of patching compound affects the door balance. Failure to follow the curing and leveling sequence correctly will result in a patch that cracks or flakes under the daily vibration of the opener motor.
Surface Preparation and Cleaning
Total decontamination is the prerequisite for any successful DIY garage door repair. Scrub the site with dish soap and water to remove oils, then use fine-grit sandpaper to strip any rust or corrosion from the shallow dents. This creates a high-friction surface essential for the patching compound to bond permanently rather than peeling off under thermal stress.
Structural Reshaping and Popping
Utilize the thermal shock method by heating the area with a lighter and immediately applying compressed air or dry ice to trigger rapid expansion and contraction. For deeper cosmetic dings, use a plunger to create suction or a rubber mallet and wood block (2×4) from the interior to gently pop the dent. The goal is to return the metal as close to its original plane as possible to minimize the amount of filler needed.
Compound Application and Curing
Apply the auto body filler (patching compound) mixed with hardener using a putty knife, pressing it firmly into any cracks or punctures. Work in thin, intentional layers to avoid air pockets that weaken the structural integrity and lead to future mechanical failure. Allow for the full manufacturer-recommended curing time before attempting to manipulate the surface or operate the door.
Sanding and Protective Coating
Once the filler has hardened, use fine-grit sandpaper in a circular motion until the repair is sanding flush with the surrounding garage door panels. After achieving a seamless transition, apply metal primer to protect against future corrosion, using aluminum foil for masking off nearby rollers and tracks. This final layer ensures the repair withstands hailstorms and high winds while completing your home curb appeal restoration.
What Garage Door Panel Repair Really Means
Garage door panel repair is a technical restoration of the door’s structural integrity rather than a simple cosmetic facelift. It involves a systematic approach to reversing the damage caused by hailstorms, high winds, or projectiles while maintaining the delicate door balance. A successful dented garage door panel fix requires you to manipulate high-gauge steel or aluminum back to its original geometric state without compromising the metal’s strength. This process often involves managing high-tension components like cables and torsion springs, making it a task that sits on the edge of DIY limits. Ultimately, a professional-grade repair ensures that the opener motor doesn’t burn out from trying to lift a warped, misaligned, or improperly weighted door.
Key Factors in Garage Door Panels Repair vs. Replacement
Determining whether to salvage a damaged panel or invest in a replacement is a critical decision that impacts both your safety and the longevity of the opener motor. You must perform a professional assessment to evaluate if the damage is limited to cosmetic dings or if the structural integrity of the cross beams has been compromised.
While shallow dents are easily managed with DIY garage door repair techniques like thermal expansion and contraction, deep creases often signify permanent metal fatigue that no amount of patching compound can truly fix. Furthermore, you must consider the door balance; adding excessive weight through heavy auto body filler for garage doors can lead to a catastrophic mechanical failure of the torsion springs.
The following table provides a high-level advisory breakdown to help you identify the DIY limits and determine when an expert opinion is mandatory for your system.
| Criteria | Repair Recommended (DIY) | Replacement Required | Impact on System |
| Damage Type | Shallow dents, cosmetic dings, and dimpled texture. | Deep creases, punctures, and jagged cracks. | Affects home curb appeal restoration and metal memory. |
| Structural State | Localized surface damage; no impact on cross beams. | Warping of the panel frame or sagging in the middle. | Compromises the structural integrity of the entire door. |
| Material Health | Surface-level rust or light corrosion only. | Holes through the metal or advanced oxidation/flaking. | Leads to rapid degradation and eventual mechanical failure. |
| Mechanical Alignment | Door stays in tracks and moves smoothly on rollers. | Door jerks, binds, or is physically out of alignment. | Increases the workload and wear on the opener motor. |
| Safety Factors | Issues are far from cables and torsion springs. | Damage is near high tension hardware or mounting points. | Risk of injury; requires expert opinion and safety protocols. |
| Cost Efficiency | Low cost ($50–$100) using metal primer and hardener. | The total cost of parts and labor exceeds 50% of a new door. | High-cost repairs offer lower ROI than full panel replacement. |
Common Garage Door Panel Damage and How to Repair It
Identifying the specific nature of a dent or fracture is the first step in maintaining the structural integrity of your entrance. Most homeowners struggle with cosmetic dings caused by projectiles or the unsightly dimpled texture left behind by severe hailstorms, both of which require distinct mechanical responses. While shallow dents can often be reversed using thermal expansion and contraction, more aggressive damage like deep creases or punctures demands the application of auto body filler for garage doors. You must also remain vigilant against rust and corrosion, as these chemical threats can cause hidden cracks that weaken the metal over time. Failure to address these issues promptly allows minor imperfections to escalate into a total mechanical failure of the tracks or rollers.
Preventing Future Garage Door Panel Dents
Establishing a rigorous prevention strategy is the only way to safeguard your home curb appeal restoration from recurring damage. High-velocity threats like hailstorms, high winds, and stray projectiles require proactive structural reinforcements, such as installing heavy-duty struts across the cross beams. You must also conduct frequent inspections for rust and corrosion, as these weaken the metal and make garage door panels more susceptible to punctures. Maintaining the alignment of the tracks and rollers reduces the internal vibration that often leads to stress-induced cracks over time. Ultimately, respecting the DIY limits of your system through regular garage door maintenance safety checks ensures that minor issues don’t escalate into a total mechanical failure.
Environmental and Physical Safeguards
Protecting your investment starts with creating a “buffer zone” to deflect potential impactors like basketballs or yard debris. During seasons prone to extreme weather, applying temporary protective padding can prevent the dimpled texture associated with heavy ice strikes. Additionally, washing the panels with dish soap regularly removes salt and chemical deposits that accelerate the oxidation process. These simple habits preserve the structural integrity of the door and minimize the need for auto body filler for garage doors.
Operational Discipline and Hardware Health
Safe operation is a cornerstone of damage prevention, requiring all users to disconnect opener systems before performing any manual adjustments. You must monitor the door balance to ensure the opener motor isn’t straining, which can cause the panels to jerk and develop warping. Keeping the cables and torsion springs properly tensioned by a professional prevents the sudden drops that cause deep creases. Finally, ensuring the door is correctly seated in its tracks prevents the metal from catching on hardware and creating avoidable cosmetic dings.
Conclusion
Effectively managing a dented garage door panel fix requires a disciplined transition from basic home maintenance to precision technical restoration. While DIY garage door repair keller tx can successfully mitigate cosmetic dings and shallow dents, maintaining the structural integrity of the door must remain your primary objective to prevent a total mechanical failure. By adhering to a rigorous repair protocol and respecting DIY limits, you protect the longevity of your opener motor and ensure the safety of your home’s largest moving assembly.
Sustainable home curb appeal restoration is achieved only when the underlying mechanics are as polished as the exterior finish. Neglecting minor rust or corrosion during the repair process can lead to long-term degradation that no amount of patching compound can eventually mask. Investing the time to ensure every repair is sanding flush and properly balanced preserves the delicate synergy between the torsion springs and the garage door panels.
Frequently Asked Questions
How does outdoor temperature affect the curing time of auto body filler for garage doors?
Extreme heat can cause the hardener to react too quickly, leading to brittle patches, while cold temperatures significantly extend the curing time and may prevent proper bonding. For the best results, perform your dented garage door panel fix when the metal temperature is between 60°F and 80°F to ensure a stable, long-lasting finish.
Can I use a household hair dryer instead of a lighter for the thermal expansion method?
A standard hair dryer generally lacks the concentrated BTU output required to reach the critical temperature threshold needed for rapid expansion and contraction. Using a lighter or a heat gun provides the intense, localized heat necessary to “shock” the metal back into its original shape when combined with compressed air.
What are the risks of using too much patching compound on a single panel?
Applying excessive auto body filler (patching compound) can significantly alter the door balance, causing the door to become “heavy” and straining the opener motor. This imbalance often leads to premature wear on the cables and can even cause the torsion springs to snap under the unanticipated weight.
Why is aluminum foil recommended for masking off tracks and rollers?
Aluminum foil is highly conformable, allowing it to wrap tightly around irregular shapes like rollers and tracks to provide superior protection against overspray from metal primer. Unlike traditional tape, it won’t leave a sticky residue that could attract dirt and debris, which eventually leads to mechanical failure in the moving parts.
Should I lubricate the tracks immediately after fixing a dented panel?
You should wait until all metal primer and paint are completely dry before performing any garage door maintenance safety tasks like lubrication. Once cured, applying a silicone-based lubricant to the rollers ensures that any minor alignment shifts from the repair don’t cause unnecessary friction or noise.
